
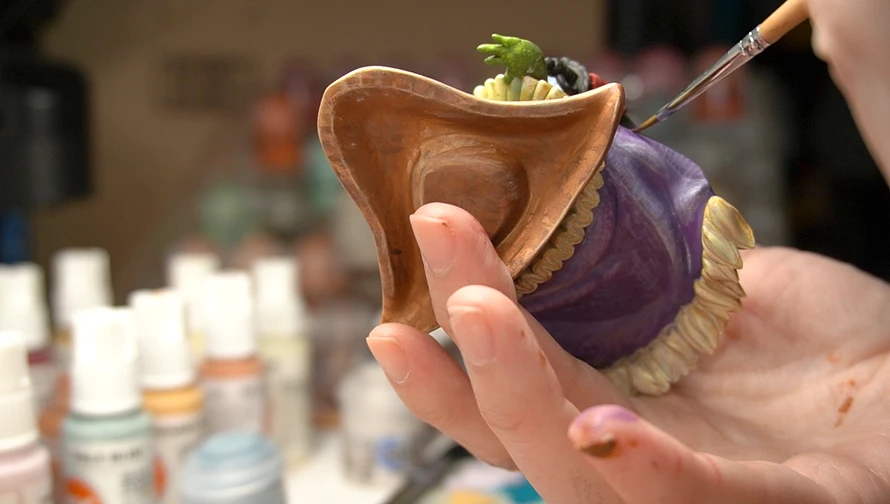
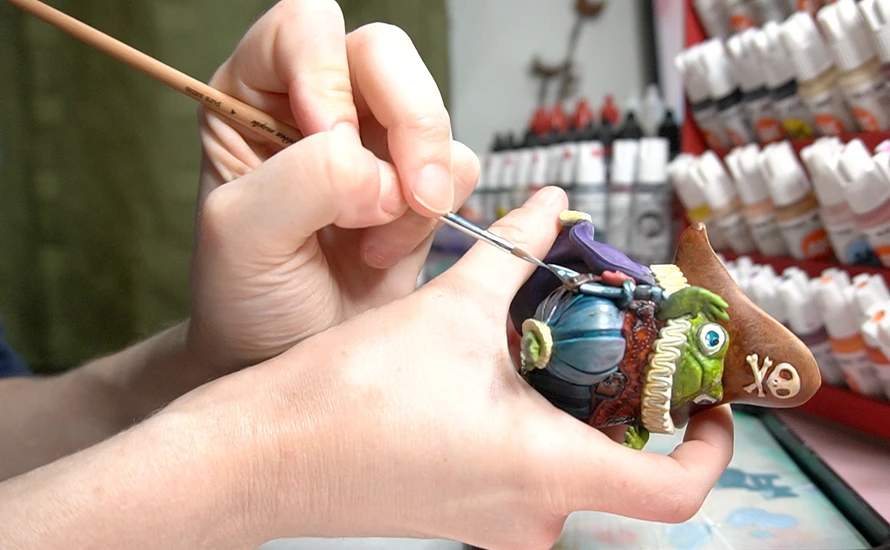
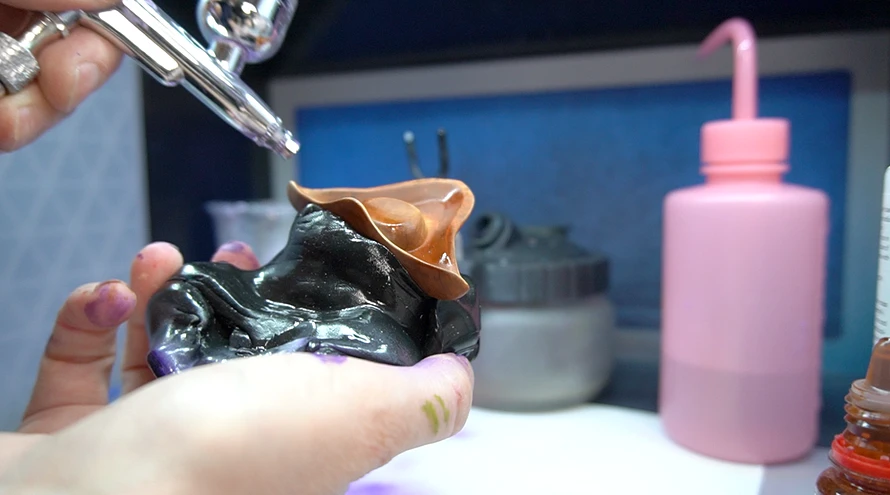
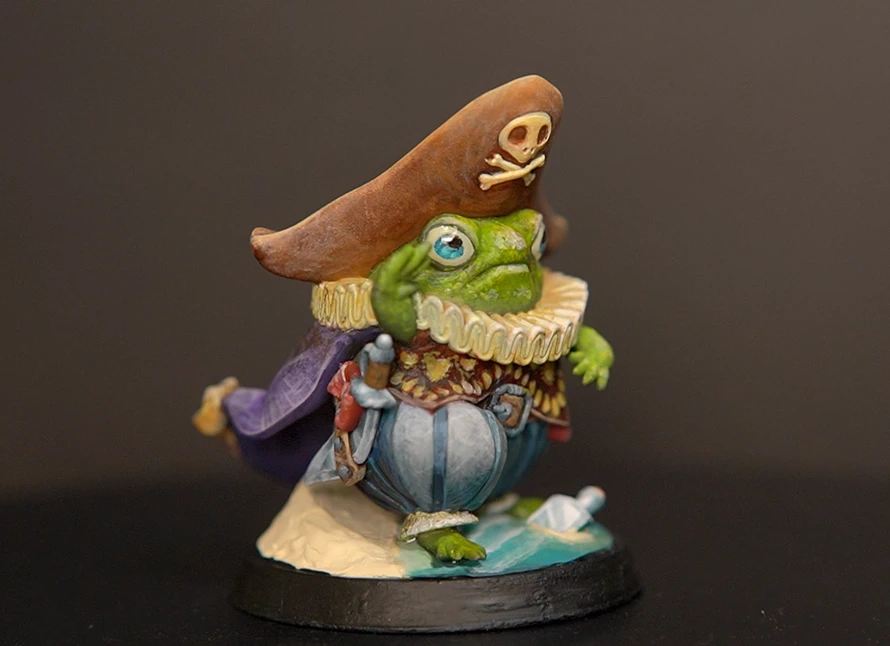
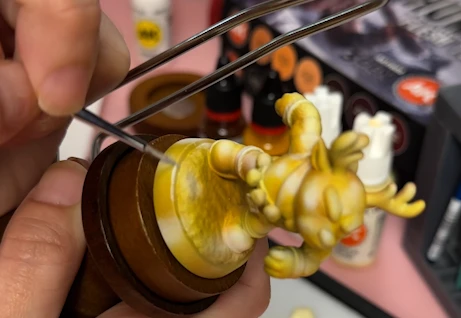
This is a breakdown of how I painted the Pepunki Creatures Pirate: Captain Billy Quacks, one of the most technically ambitious minis I had tackled at that point. What made it interesting was not any single technique but how many different tools and approaches were needed to finish it, and how they had to work together rather than in sequence.
🎥 You can watch the video here: youtube.com/shorts/KYn2D-uyTNM
1. Colour theory first
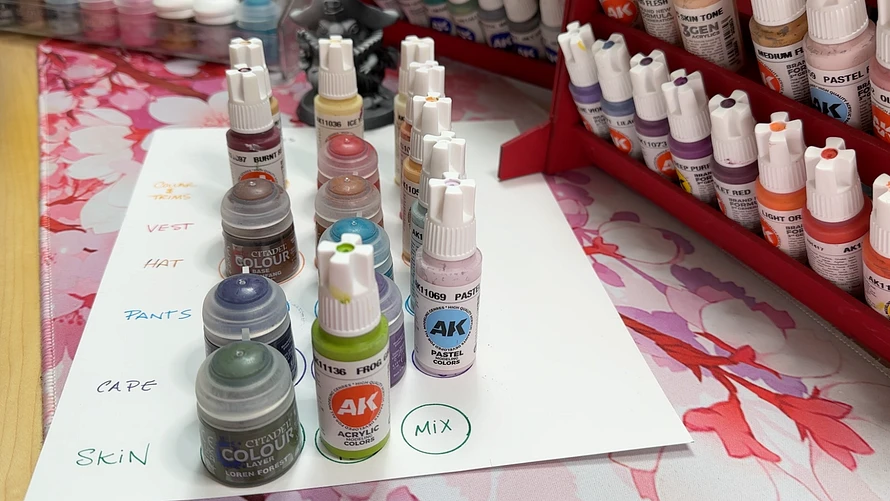
Before touching the mini, I worked out the colour scheme using a Rectangle Tetradic structure. This takes four colours arranged as two complementary pairs on the colour wheel, giving you a wide colour range that still feels coordinated rather than random.

From those four colours I set up the full value range for each: a shade, a midtone, and a highlight. Doing this before starting means you are not making decisions mid-session about whether a colour is too warm or too cool. You already know where each one sits and what its job is.
2. Airbrush for colour transitions
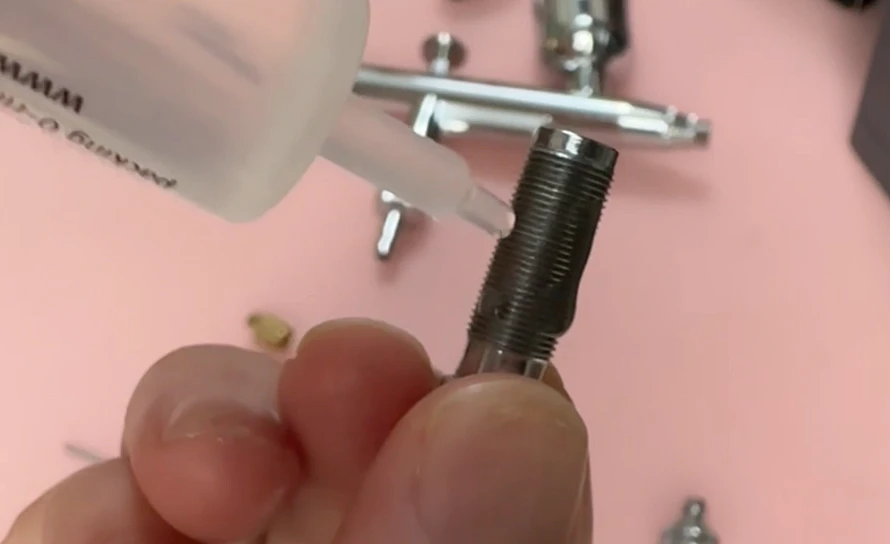
I used an airbrush for the broad basecoats and colour transitions across the larger surfaces: the cape, the pants, the hat, and the skin. Starting with the shadow colour, then working the midtone into the raised areas, then catching the highlights at the peaks. I used masking putty to cover up the painted areas as I progressed.
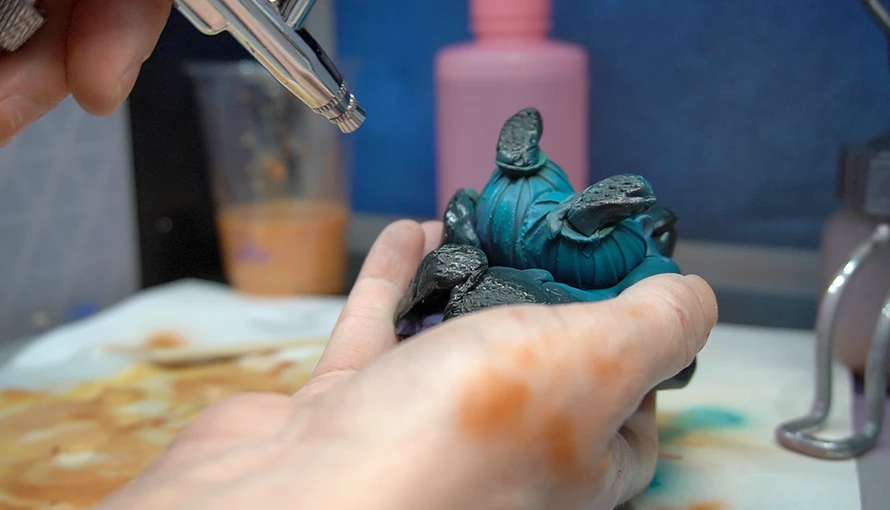
Paint thinning was still something I was figuring out. I got one mix too thin on the face and the paint ran into the details. I cleaned it up and restarted that section. Tip dry was also a problem mid-session, and at one point I had a nozzle clog that sent highlight paint scattering like glitter. These are not disasters, just part of airbrushing. You stop, clean, adjust, and keep going.
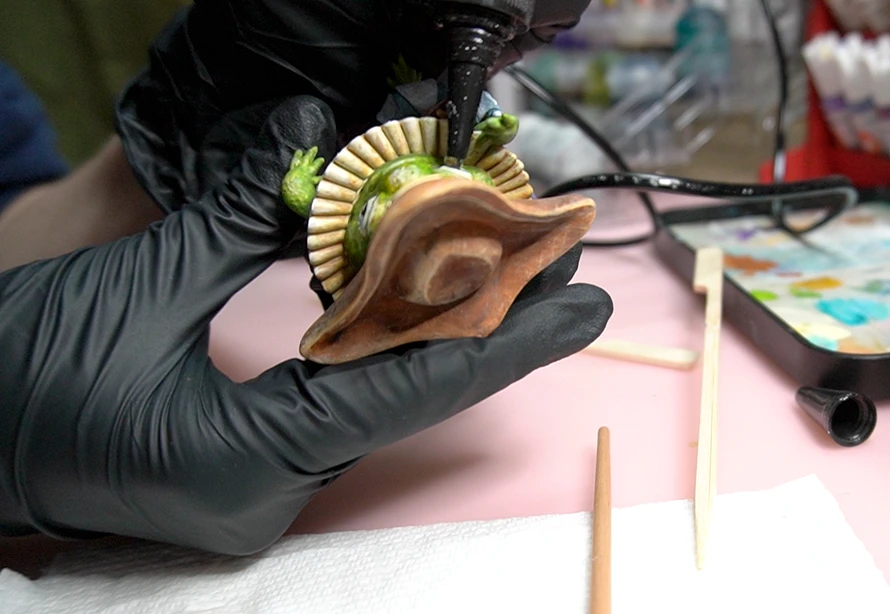
3. Brush for texture and character
The airbrush is good at smooth transitions and coverage, but it cannot do the close detail work like textures, lace, or small buttons.
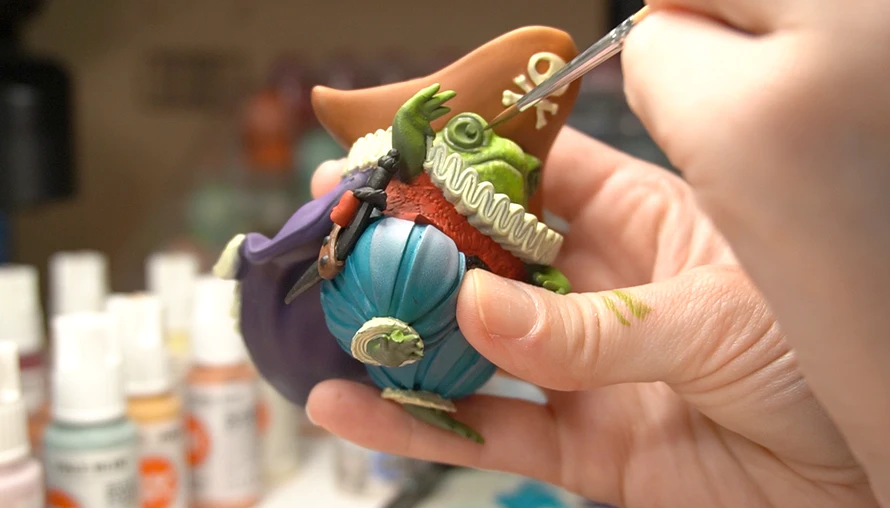
The skin texture came from stippling. Gently using the brush tip and very little paint, I dabbed a series of small dots across the skin surfaces to build up a rough, leathery texture.
For the leather hat, I painted marks, scratches, and damage, then used contrast paint to push the weathering further. I painted a pattern of worn fabric texture on the cape and pants, involving layering, painting strands, and sponging contrast paint.
For the collar, I added yellowing and staining using diluted yellows and browns, working wet into wet (wet blending) to keep the transitions soft.
The sword got a pass of Non-Metallic Metal, painting the reflection using just light and dark paint rather than any metallic pigment. Placing the highlights on the edges and letting the rest drop into shadow.
I pulled the airbrush back out to add ink-based contrast into the deeper recesses of the hat and to push the shadows further once the brush work was mostly done. Going back to the airbrush at this stage, after the details are in, lets you unify the contrast across the whole mini without redoing the detail work.
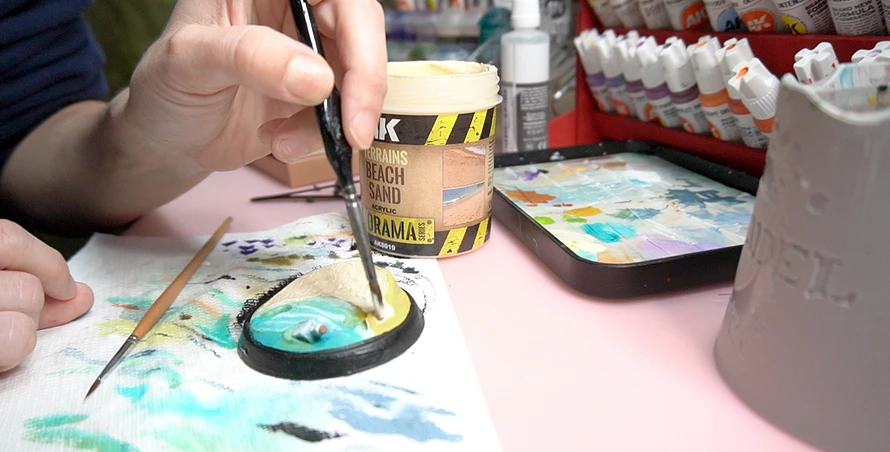
4. UV resin for the eyes and water
The eyes of this mini are hollow. When I noticed that during the painting session, I immediately wanted to use UV resin to fill them. Clear UV resin catches light in hollow spaces in a way that paint cannot replicate, and the effect on eyes specifically is striking.
The base is a sandy beach shore with white wave edges. After painting the sand and water tones, I applied AK Interactive terrain beach sand for texture. Then I poured a thin layer of UV resin over the water area, which gave it a wet, reflective surface that matched the painted finish underneath. The resin layer unified the water in a way that paint alone would not have.
The actual takeaway
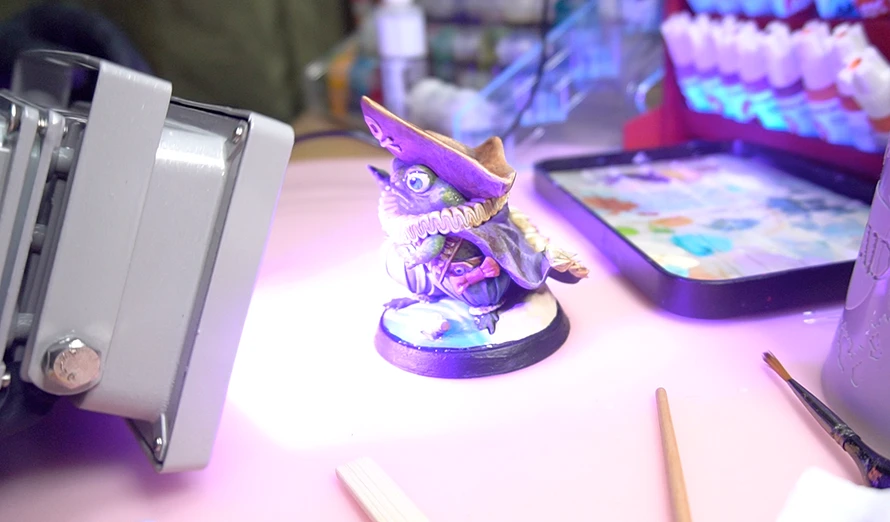
The workflow on this mini was not linear. I went back and forth between airbrush and brush multiple times, layering effects and going back into areas to increase contrast and weathering.
The single biggest shift in how this mini turned out versus earlier ones was committing to textures. Stippled skin, weathered fabric, sponged staining. Each one takes more time than a clean basecoat and highlight, but the result reads completely differently.
The full toolkit and more painting resources are at couplecraftsminis.com/pages/start-here.
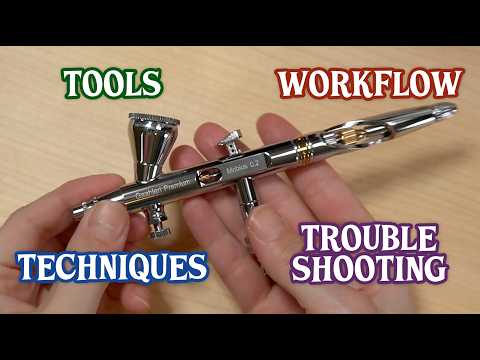
This video covers the main things I have figured out so far about airbrushing for tabletop miniatures including the tools, the workflow, the techniques, and the problems I kept running into and how I eventually sorted them out.
🏷️ #ad: Gaahleri Airbrush and Paints. Use code CCM for 10% off
- 📋 Learning Airbrushing Cheat Sheet
- 📝 Airbrush Anatomy 101: What Every Part Does
- 🎨 Free Mini Painting Resources
- 🛠️ Complete Painting and Crafting Toolkit List
- 🐉 Squidmar Miniatures Strakh Dragon
- ⵌ Squidmar Miniatures Airbrushing Video and Practice Template
🎥 Watch the complete Mini Painting Learning Journey series and see how we are learning mini painting.

A sticky trigger, sluggish needle movement, or air that leaks when it should not are often signs that your airbrush needs lubrication rather than a deep clean. This is a quick maintenance step that most airbrush owners skip until something starts feeling off.
When your airbrush needs lubrication
The most common signals are a trigger that feels stiff or catches when you press it, a needle that does not move smoothly when you pull back, slight air leaking around the trigger area, or general inconsistency in the spray that cleaning alone does not fix.
One thing worth knowing: if you soak your airbrush as part of a deep clean, the soaking process removes a lot of the lubricant from the internal parts. That means a deep clean is always a good moment to follow up with lubrication.
What you need
A dedicated airbrush needle lubricant or a PTFE-based lubricant for the air valve and moving parts, ideally sicilon-free. Do not use WD-40 or general-purpose oils as they can damage the seals inside the airbrush.
The 6-step lubrication process
Step 1. Take your airbrush apart. Disassemble it the same way you would for a deep clean: remove the handle, needle chucking nut, needle, and the front assembly including the nozzle cap, air cap, and nozzle. Lay the pieces out in order so reassembly is straightforward. If you want to know more about airbrush parts, check out this post.
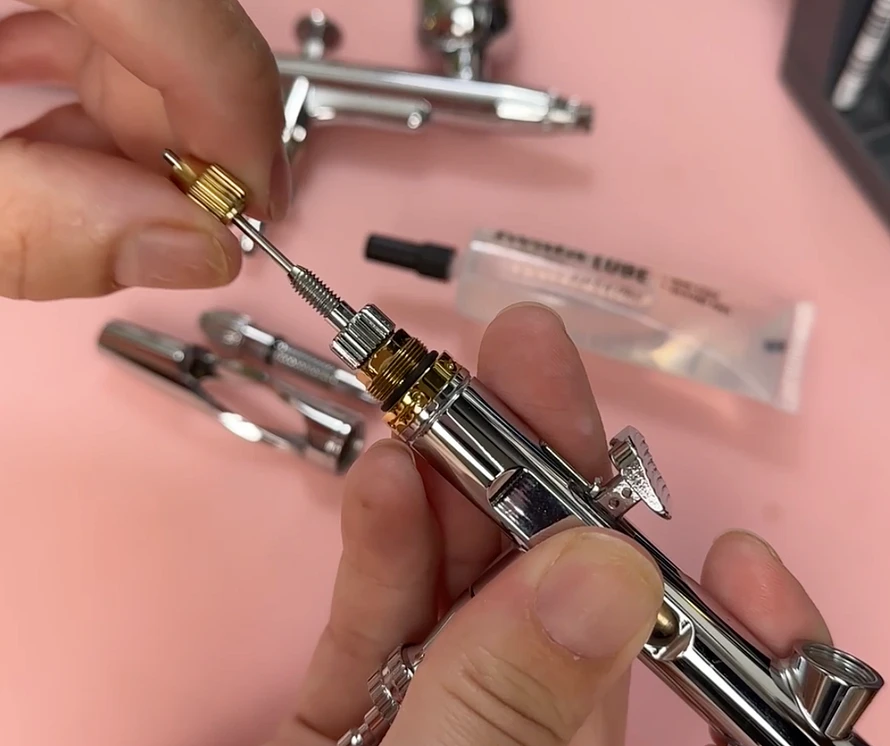
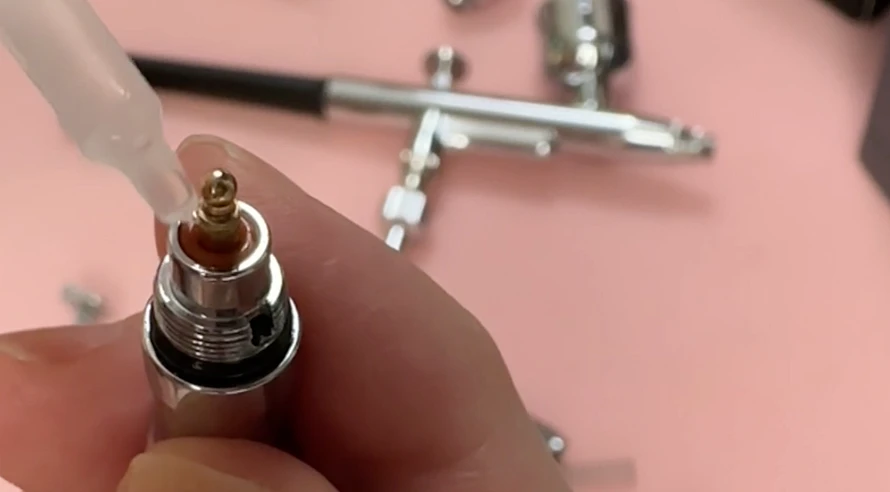
Step 2. Start with the air valve. Apply a small amount of lubricant to the air valve at the bottom of the airbrush body. This is the component the trigger presses down on to release air, and it is a common source of stiffness. A small drop is enough.
Step 3. Lubricate all other moving parts. Work through any other components that move against each other, including the trigger pivot point and any internal guides. A light application on contact surfaces is all you need.
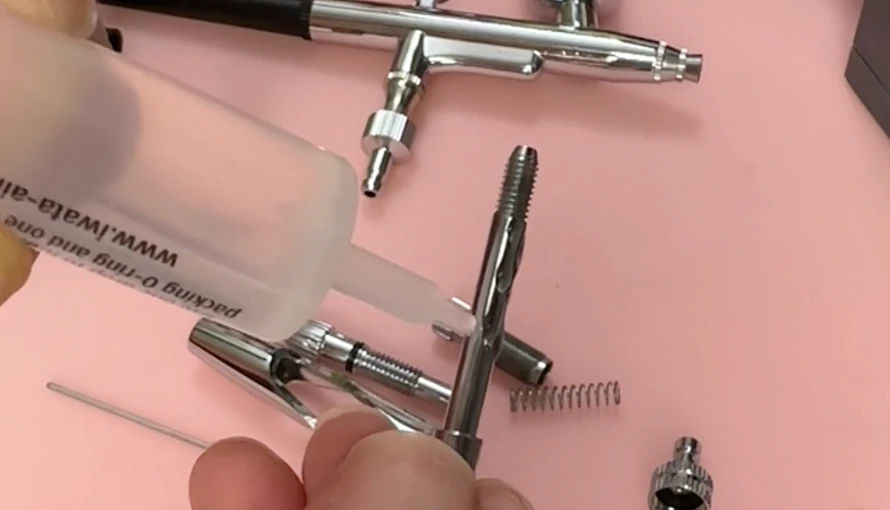
Step 4. Lubricate the screw threads. Apply a thin layer to any screw threads, including the needle chucking nut and the nozzle threads. This makes reassembly smoother and protects the threads over time.
Step 5. Lubricate the front half of the needle. Apply a very small amount of lubricant to the front half of the needle, roughly the section that sits inside the nozzle assembly. Wipe off any excess. Too much lubricant on the needle can cause paint adhesion issues.
Step 6. Reassemble. Put everything back together in reverse order. The trigger and needle movement should immediately feel noticeably smoother.
The process is similar across most dual-action airbrush models, so these steps apply whether you are working with a beginner setup or a higher-end model.
If you want the full airbrush cheat sheet covering tools, workflow, techniques, and troubleshooting, you can check out this article.
And if you want to browse the full toolkit we use, it is all listed at couplecraftsminis.com/pages/our-toolkit.

This is Part 2 of our ongoing series on building a crafting toolkit from scratch. If you missed it, Part 1 covered adhesives. This one is all about cutting tools: what you actually need to start, and what to add as your projects grow.
Start here: the three beginner essentials
These three tools cover the vast majority of cutting tasks when you are starting out. If you are building your first kit, get these before anything else.
1) Cutting mat: Protects your work surface and extends the life of your blades. A self-healing mat is worth the slightly higher price since it closes up after each cut and stays smooth much longer. Size matters: go bigger than you think you need.
2) Hobby knives: The most precise cutting tool in the toolkit. The standard handle takes interchangeable blades, so you can swap to a fresh edge whenever the cut starts to drag or tear instead of slice. We go through a lot of blades and it is worth keeping spares on hand.
3) Scissors: A reliable pair of general-purpose scissors does more work than any other cutting tool in a basic kit. Keep a dedicated pair for crafting so you are not hunting down the kitchen scissors every time.
Next additions as your projects grow
Once the basics are covered, these tools solve specific problems that come up as you work on more complex builds.
Circle cutter: Cutting clean circles with a hobby knife is frustrating and inconsistent. A dedicated circle cutter solves this immediately and is worth adding early if circles appear in any of your projects (they appear in almost all of ours).
Bevel cutter: Cuts at a precise angle rather than straight down, which creates clean mitre edges for joining foam or cardboard at corners. Difficult to replicate with a standard blade. They are not all equal in quality, some work better than others.
Decorative edge scissors: Scissors with a patterned blade that cut a decorative edge in a single pass. We use these for terrain textures, shingles, and edge details on paper and thin cardboard.
Thread snips: Small spring-loaded scissors designed for fine detail cutting and trimming. Great for cutting thin string, thread, twine, thin strips of material, stay paintbrush hair and anything that full-size scissors are too clumsy for.
Paper trimmer: Cuts straight lines quickly and consistently across a full sheet. Much faster than a ruler and knife for paper and thin cardboard, and the cut is cleaner. Useful for making cards, scrapbooking, and tags.
Paper punches: Cut specific shapes out of flat material in a single press. We use them for making uniform circles, leaves, and decorative elements in terrain and diorama work.
Pruning shears: A tool borrowed from the garden. These cut real branches, coffee sticks, skewers, and dried plants cleanly, which makes them useful for terrain work where you want natural organic shapes that foam or wire cannot replicate.
Foam-specific cutting tools
If foam is a significant part of your projects, these two tools make a meaningful difference in quality and efficiency.
Hot wire foam cutter: Cuts through XPS foam with heat rather than a blade, which produces a smoother edge and much less crumbling. A handheld version is a good starting point. We used one throughout the Blizzard's End build.
Foam cutting table: A flat surface version of the hot wire cutter, often with a jig or guide for spinning pieces. This is what we use to cut clean circles out of foam, which is otherwise extremely difficult to do consistently.
The full toolkit list with product links is on our toolkit page.

Edge highlighting is one of those techniques that looks simple in theory but can be challenging in practice. A thin, consistent line of lighter paint along a sharp edge. That is all it is. And yet it can be really easy to drop off the edge and mess up your nice paint job.
Most of the time, the problem is not the brush. It is the hand holding it.
(Disclaimer: This post contains a Golden Maple promotion and a discount code below.)
What edge highlighting actually is
Edge highlighting is applying a lighter colour along a raised edge to make it stand out. It mimics the way light catches sharp surfaces, making shapes easier to read and giving the mini more visual definition.
It is used on armour panels, weapon blades, clothing folds, and any area where two surfaces meet at a clear angle. Even a simple, single-pass edge highlight makes a significant difference in how finished a mini looks.
Why the hand matters so much
Unlike dry brushing or washes, which are forgiving techniques, edge highlighting is a precision technique. The line needs to be thin, it needs to stay on the edge and not spill onto the face of the surface, and it needs to be consistent in width across the whole area.
Any small movement in your hand changes the line. And unlike a stroke that goes slightly off on a broader surface, a wobbly edge highlight is immediately visible.
How to stabilize your hand
Stability comes from contact points, not from tensing your muscles.
A few approaches that work well:
-
Rest your painting hand against the table. Even a light contact point reduces floating movement significantly. You are not gripping anything, just letting your hand touch down.
-
Bring your hands together. Hold the mini in one hand, brush in the other, and let them touch. Now both hands move as one unit. Small corrections become much easier to control.
-
Rotate the mini instead of your hand. If the angle feels awkward, turn the mini rather than twisting your wrist. This keeps your brush in a natural, controlled position. This is a lot easier to do for small minis if you are using a painting handle.
- Pause your breathing briefly for very precise strokes. This sounds unusual but it works. Your body moves slightly with every breath. For a single critical highlight, a short pause gives you a still moment to work in.
- Pull the brush, do not push it. Pulling keeps the tip together and produces smoother, more predictable lines. Pushing tends to split the tip and makes the stroke harder to control. Most of the time, you can also use the side of the brush instead of the tip.
Where a painting handle comes in
A handle does a few things beyond just giving you something to grip.
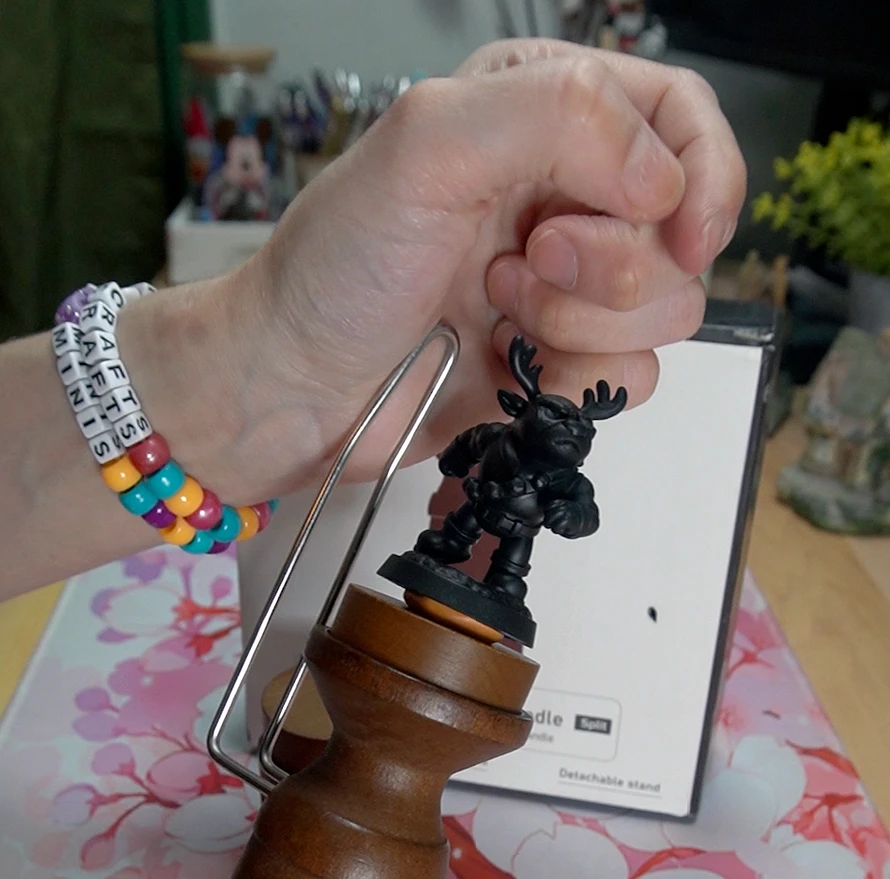
The main one is that it provides a surface to brace against. By pressing the side of the handle against your other hand or against the table, you create a stabilizing contact point without limiting how you can move the brush. Some handles come with a stabilizing metal bracket. It provides additional contact points and extra angles for added precision and reaching areas that can be difficult.
It also lets you rotate the mini freely without putting your fingers near the paint, and it keeps the mini at a consistent height and angle while you work, which matters more than it sounds when you are trying to match highlight width across a long edge.
We received the Golden Maple handle to try and it has become the one we reach for without thinking. Code CoupleCraftsMinis gets you 15% off if you want to try it: Golden Maple Painting Handle. ↗️
What to watch for
Even with a steady hand, edge highlighting can go wrong in a couple of consistent ways:
-
Lines too thick. Usually a paint consistency problem. The paint is too fluid and spreads when it touches the surface. Thin slightly less, or remove more excess paint from the brush before applying.
-
Blobs at the start or end of strokes. Too much paint loaded. Unload on your paper towel before each stroke, not just at the start of the session.
- Inconsistent width. Usually pressure. You are pressing harder at some points than others. Light pressure and letting the edge of the brush or the tip do the work solves this more reliably than trying to consciously keep the line even.
- Too much contrast. The highlight colour is too light relative to the base. Start closer to your base colour and work up gradually rather than jumping straight to a bright highlight in one pass.
💡 If you want more mini painting tips, you can download our free mini painting guide and read through our Getting Started page.

If you've ever held an airbrush and thought "I have no idea what half of this does," you're not alone. That was us too.
(Disclaimer: Promotion and Discount Code below)
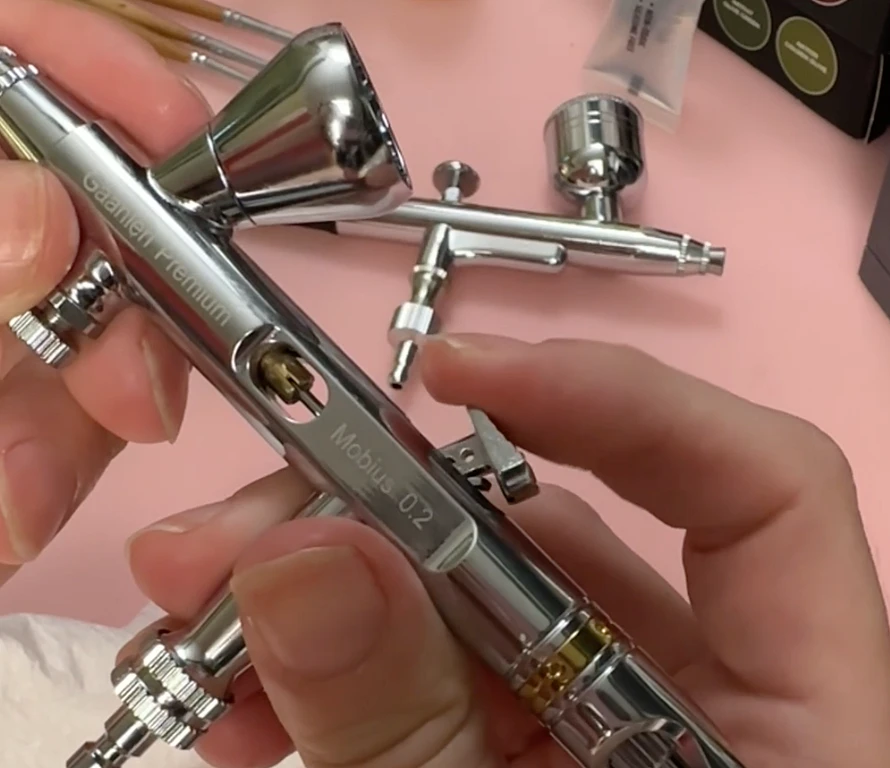
The first thing we do whenever we get a new airbrush is take the entire thing apart. It sounds like a strange way to start, but it's the fastest way to actually understand the tool instead of just hoping you're using it right.
Most airbrushes share the same core parts, even if the exact design varies model to model:
- Paint cup feeds paint into the airbrush by gravity
- Handle so you can actually hold the thing
- Fluid control knob adjusts how much paint sprays (on some models)
- Needle opens or blocks the nozzle to release paint
- Needle chucking nut secures the needle to its guide
- Air cap and nozzle cap direct airflow and protect the nozzle and needle
- Quick release lets you disconnect from your compressor hose fast (often sold separately)
- Air valve what the trigger presses to let air through
- Dual-action trigger press down for air, pull back for paint
- Spring and spring guide return the trigger and needle to position
- Spring case holds the spring components in place (some models)
- Needle chucking guide guides the needle forward and back
- Airbrush body where needle, paint, and air all meet before exiting through the nozzle
Not every airbrush is built the same. Better materials and engineering in higher-end models make a real difference in how consistent and reliable they feel in practice.
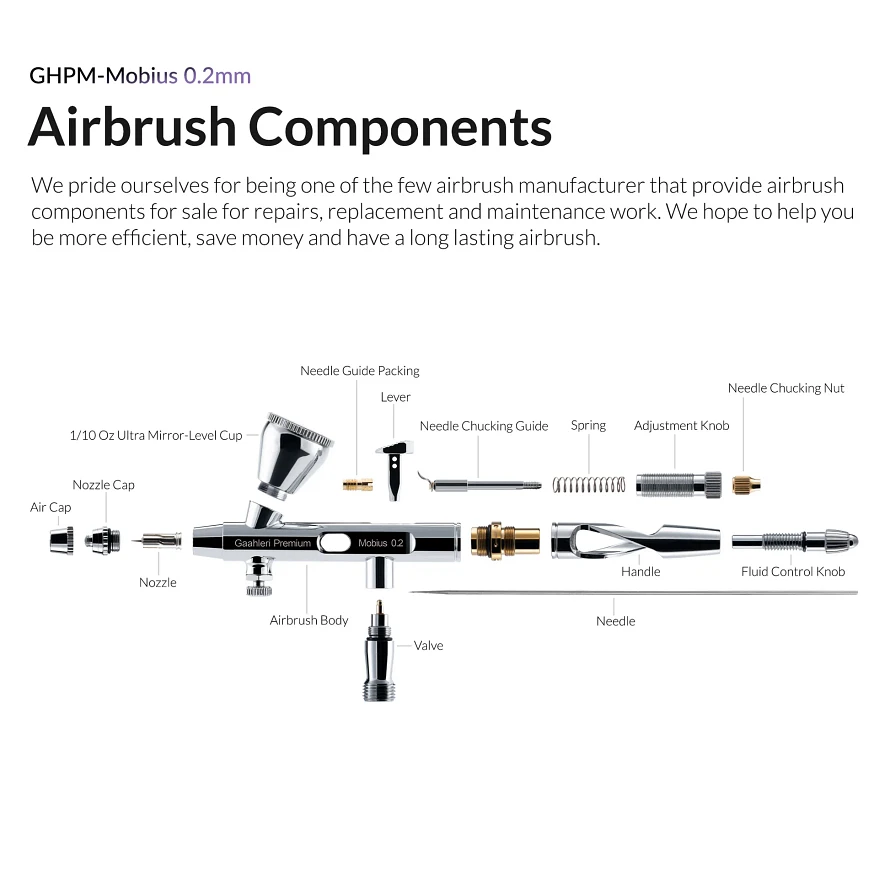
This breakdown features the Gaahleri Mobius 0.2, the airbrush we now use for all our airbrush projects.
- Use the code CCM gets you 10% off on their site ↗️ anytime.
- And if you're shopping during Prime Day (June 23-26 2026), code ODDLV8BN gets you an extra deal on their Amazon US store. ↗️
🎥 Watch the full breakdown on YouTube! ↗️

We recently painted a mimic miniature and tracked the time across each step. The total came out to just over three hours for a tabletop result.
That number is useful, but it becomes clearer when you look at how the time is distributed across the process.
Time breakdown for this mini
Here is the full breakdown from this specific example:
-
Priming (with zenithal): 15 min + drying
-
Mouth base coat: 21 min
-
Chest base coat: 25 min
-
Non-Metallic Metal (practice): 28 min
-
Tongue: 7 min
-
Eyes: 15 min
-
Finishing touches: 33 min
-
Varnish: 4 min
-
Base (polymer clay + texture): 16 min + baking
Total ~3h 4min
Looking at it this way, most of the time is not in one single step. It is spread across multiple stages, with basecoating and finishing work taking up a large portion of the total.
What this shows about painting time
The process moves through different types of work. Some steps are quick but precise, like painting the eyes. Others take longer because they involve building up layers or trying something new, like practicing Non-Metallic Metal.
There are also steps that are easy to overlook when estimating time, such as varnishing or building the base. These are part of the full process and contribute to the final result.
Painting time includes more than just applying paint. It also includes pauses, drying time, corrections, and adjustments between layers.
Time depends on the approach
There is no fixed time for painting a miniature. The same model can take very different amounts of time depending on how it is approached.
A useful way to think about this is by painting style rather than exact hours.
Common painting approaches
-
Speed / Slap Chop: ~30 min to 1–2 hours, Fast contrast and strong readability for Board games and large batches
-
Standard / Tabletop: A few hours to several sessions, Clean base and basic highlights/shadows for most everyday minis
-
Practice / Technique-focused: Variable - often longer, Learning a specific skill (NMM, glazing, etc.) for skill building
-
Display / Showcase: Many hours to days, High refinement and smooth transitions and detail work for display pieces, competitions
This reflects how different approaches naturally lead to different time investments.
Painting in sessions
Even though this example adds up to about three hours, it does not need to be done in one sitting.
Painting is often broken into sessions. Each session focuses on a part of the process, with natural pauses for drying and adjustments.
This makes the process easier to manage and allows each step to be done with more control.
How time changes over time
As experience builds, some steps become faster because they are more familiar. At the same time, exploring new techniques can increase the time spent on a miniature.
The total time does not always decrease. What changes is how controlled and predictable each step becomes.
If you want to explore this further
If you want a structured way to approach painting time and improve specific parts of the process, you can download the free mini painting guide.
We also share ongoing experiments and techniques on Discord. If you want to share your work or ask questions, you are welcome to join us there!
You can also see what painting tools are in our toolkit if you are still building yours.


We really enjoy making props and small furniture. Recently, we finally got balsa wood, which is really light and easy to cut. Most of our previous projects were made using dollar store stick sticks and popsicle sticks. It works fine but it's heavier and harder to cut.
🎥 The first project we made with it was 3 standard-size DnD tavern tables. You can see the video here.
We got a pack of 2mm, 3mm, and 4mm square dowels. We also finally got wood glue, which is more appropriate than hot glue.
🧰 You can see all the adhesive we use here and the speciality crafting material we use here.
📐 Here are the measurements for the 3 main parts:
- Tabletop: 3mm - 24 x 2" (Total: 3 tabletop of 2"x1")
- Legs: 4mm - 12 x 3/4"
- Support: 2mm - 6 x 1/2"
I assembled the 8 sticks for the tabletop using wood glue. I wipped off the excess with a paper towel. I made sure to trim the table ends with my hobby knife to even out everything and gave it a bit of a sanding. And then, through a bit of a painful process, I glued the 4 legs and a leg support between each pair.
To finish it all, I used red and green ink to paint the wood and preserve the texture. As ink is translucent, it acts more like a stain than paint cover up. I used red and green to get some variations in the brown mix I made. I used black ink to weather some areas further. I finished it all off with a white paint dry brushing.
🧰 Material
- Balsa wood 2mm, 3mm, 4mm sticks
- Wood glue
- Hobby knife
- Self-healing cutting mat
- Green, black, and red ink
- White paint
- Paintbrush and dry brush
- Paper towel
- Painter's tape
- Sanding paper
If you would like to share some of your own crafting projects or tips, join our Discord! We would love to learn from you and see what you are working on! ❤️